


Update 2/21/2018:
Since we wrote this piece in 2014, there’s actually an easier way to add SSL and HTTP/2 using Cloudflare instead of CloudFront. The instructions from the one you just did are too difficult for me to easily troubleshoot for you, but this new method is fairly straighforward & free!
Before I begin, let’s be honest about you, SEO and SSL.
Now that SSL is a supposed ranking factor, you are going to implement it. You can deny it all you want, but you’re going to do it. Everyone knows you’re old school and that you refuse to give into Google’s manipulation of SEOs, but it’s really just a matter of time until you do it.
How do I know this? Because one day you’re going to wake up and find that your site’s rankings have dipped. The next thing you’re going to do is look at the SERPs to see which sites rank above yours. When you do, you’re going to see that most websites are using SSL.
The funny thing is that your loss in ranking may have nothing to do with SSL, but you won’t know that. All you’ll know is that all or most sites that rank better than yours are using SSL. That’s because everyone else added SSL while you were making fun of them. And now, well now you’re going to add SSL, because you can no longer take a chance on it not being a ranking factor.
So, I’m going to take you through, step-by-step, on exactly how to do this. You can thank me later 😉
How To Add SSL to WordPress
If you’re new to SSL, then you will soon find out that adding it to WordPress (or any site in general) is a pain in the butt. The certificates aren’t easy to create, and if you have any insecure page assets, browsers will throw a security error. And it gets even more complicated when you want to use a content delivery network (CDN) for your media files. But don’t worry about that, because I’m going to walk you through every step of securing WordPress with SSL.
What makes up the perfect secure WordPress site? Three things:
- The domain is secure, along with its themes assets
- The site uses CloudFront (or an equivalent CDN to serve its assets
- When media is added, it defaults to using https (bonus points for it using your own domain or subdomain)
Step 1: Create the Private Key and Certificate Signing Request (CSR)
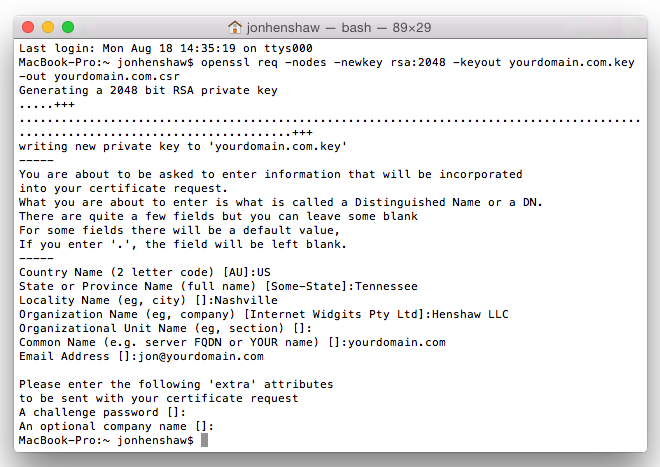
The private key is used to create the CSR and is also used when installing the certificate on the server. The CSR is used for requesting a certificate. To create a Private Key, you will need OpenSSL. OpenSSL usually comes preinstalled on Mac OS X, Linux and UNIX, but not Windows. OpenSSL for Windows is available as a free download from OpenSSL’s site.
Open the Terminal app and then change the directory to the location you want to save the Private Key and CSR. I usually create them in my Downloads folder.
$ cd ~/Downloads/
The next step involves using OpenSSL to create the Private Key and CSR. Type in the following, changing yourdomain.com to the domain or subdomain you plan to use with the certificate.
$ openssl req -nodes -newkey rsa:2048 -keyout yourdomain.com.key -out yourdomain.com.csr
OpenSSL will then ask you to answer a series of questions, one at a time. You will need to answer all of them, except Organizational Unit, which is optional. When it asks for the Common Name, enter the domain or subdomain you want to make secure. Also, you can skip the last two questions that ask for a Challenge Password and optional company name. Here’s an example of what it should look like:
Step 2: Order the certificate
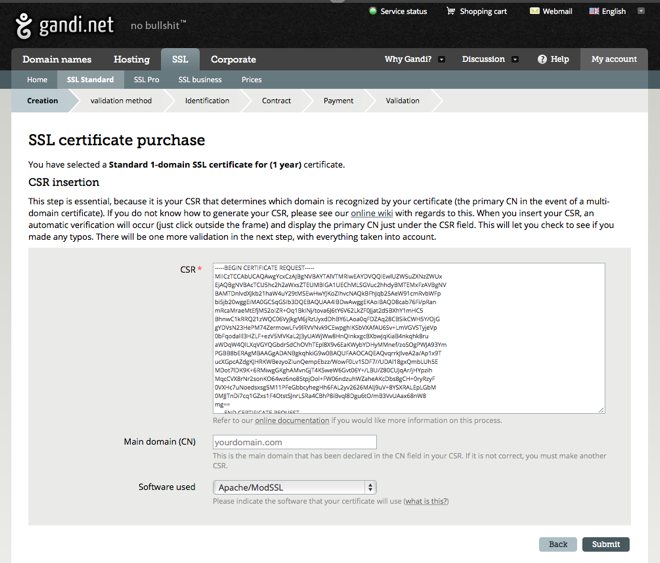
There are numerous places that sell certificates, but my favorite is Comodo. And chances are, your favorite hosting provider and/or registar actually resells Comodo certificates. For me it’s Pair Networks and Gandi. If you register or transfer your domain to Gandi, they will actually give you an SSL certificate for free for the first year, and then it’s super cheap afterwards. That’s what I’ve done with my sites.
Find and open the CSR you created and open it using a text editor like TextMate. Copy and paste all of the text into the CSR input field of the certificate provider. Make sure you select Apache/ModSSL for the software used to create the CSR. This is what it looks like on Gandi using the yourdomain.com example:
Step 3: Verify ownership and identity
This step depends on the certificate authority and the type of certificate you ordered. Since Google seems only to be concerned about sites encrypting their data using 2048 bit digital signatures, you can usually buy the cheapest option which only requires you to verify ownership of the domain. The process is usually similar to verifying a site with Google Webmaster Tools (GWT).
Step 4: Install the certificate
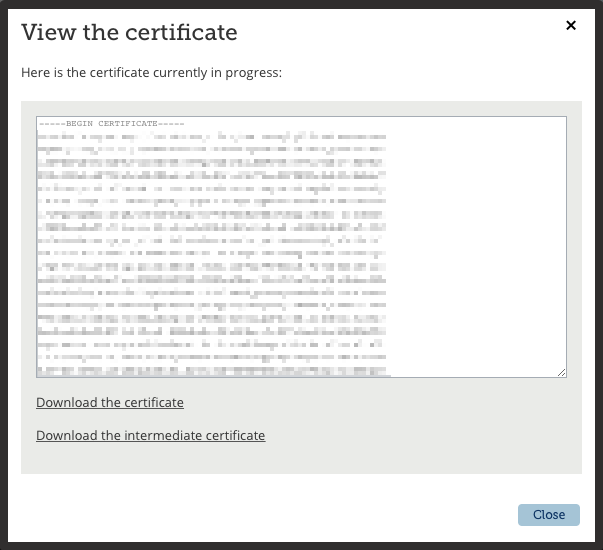
Once the certificate is ready, the certificate authority will provide the certificate and will also usually provide an intermediate certificate. You will need both of these because, if you don’t include the intermediate certificate, you’ll get a certificate error on your site after it’s been installed. This is what it looks like when I get my certificates from Gandi:
In most cases, you’ll want to submit a support request with your hosting provider and request that they install the certificate for you. Every hosting provider has a different procedure, and some companies may charge you to have them install it for you. I use Pair Networks, and they had me upload the files to a private folder on my account. They installed it for free and did it within a few hours after I submitted the request.
Step 5: Change the WordPress Settings
Once you’ve verified that the certificate is installed correctly, login to your WordPress Admin. Go to Settings > General and add an ‘s’ to the WordPress Address and Site Address; then save the changes.

Step 6: Update .htaccess to redirect all non-secure traffic to https
Open the .htaccess file for your site and add the following code (replacing yourdomain.com with your own domain). This code will redirect all non-secure traffic to the SSL version.
# HTTPS Redirect
 RewriteEngine on
 RewriteCond %{SERVER_PORT} 80
 RewriteRule ^(.*)$ https://yourdomain.com/$1 [R=301,L]
Step 7: Clean up non-secure links in Pages, Posts and Themes
Since WordPress doesn’t use relative links when it adds uploaded media to posts and pages, you’ll need to update all of the media links to use https. You’ll need to either add the ‘s’ or alternatively leave off the protocol and just use the slashes like this: //wp-content/uploads…
But wait, there’s more! While most WordPress themes use relative internal links, some do not. You need to check and see if your theme – especially if it’s a custom built theme – has any hard-coded non-secure asset links.
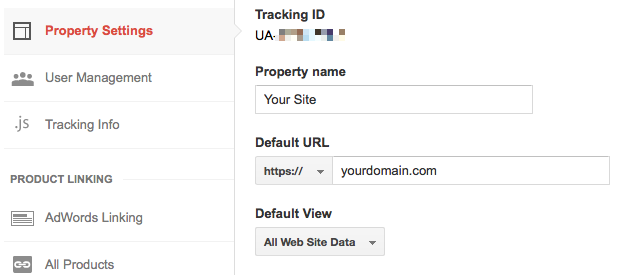
Step 8: Change Google Analytics
This is quite possibly the easiest step. You need to change the settings on Google Analytics to use https. Go to Google Analytics, find your site, and then go to the Admin settings. In the Properties section, change http to https.
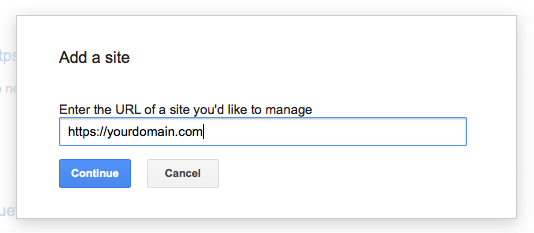
Step 9: Add site to GWT
It ends up that GWT isn’t as smart as Google Analytics. GWT requires you to add your site again, but as a secure site this time. It’s important that include https when entering the URL.
Congratulations! You did it! Unfortunately, it’s not good enough. What happens if your site gets a ton of traffic and/or becomes globally popular? Without a Content Delivery Network (CDN) your site could be screwed.
I’m going to show you how to add CloudFront – my CDN of choice – to WordPress with a secure connection.
How To Add CloudFront with SSL to WordPress
In order to use CloudFront, you’ll need an Amazon Web Services (AWS) account.
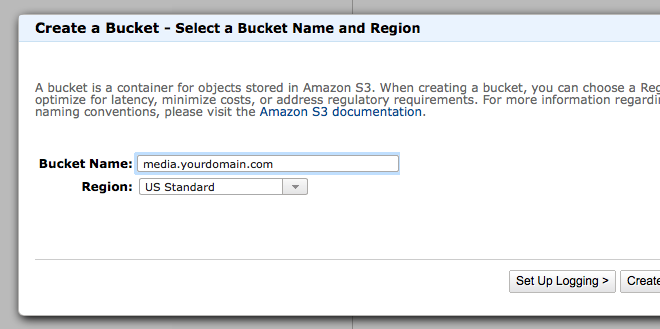
Step 1: Create an S3 Bucket
Login to AWS and then go to the Management Console. Then go to the S3 management page. Click the Create Bucket button and name your bucket. The bucket name must be a unique to all of S3. I usually name my buckets media.yourdomain.com or cdn.yourdomain.com regardless of whether or not I plan on actually using those subdomains.
Step 2: Create a CloudFront Distribution
S3 only serves files from the datacenter it’s stored at, whereas CloudFront takes those files and distributes and serves them worldwide. For example, if your S3 bucket and its associated files are stored in a datacenter that’s located in Virginia, and you get a user visiting your site from Australia, CloudFront will deliver your files from a data center located in the Asia Pacific region instead of Virginia.
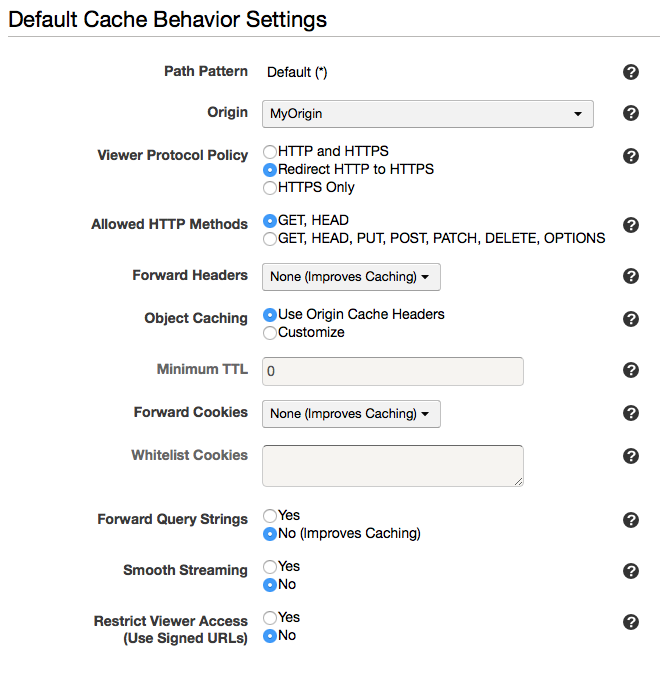
From the Management Console, go to the CloudFront management page. Click on the Create Distribution button. For the Origin Domain Name, choose the S3 bucket you created. For the Origin ID, name it whatever you want, like MyOrigin. Your Default Cache Behavior Settings should look like the following:
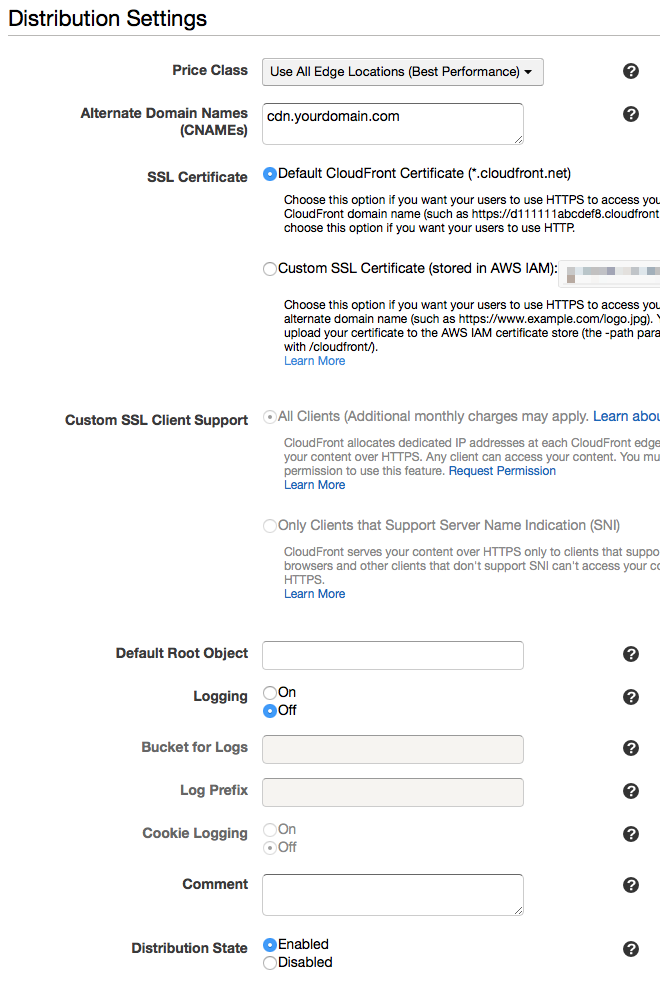
For the Distribution Settings, if you plan to use your own subdomain or domain, enter it in the Alternate Domain Names (CNAMEs) textarea. I’ll explain how to use your own secure domain for CloudFront later in this post. However, for now, choose Default CloudFront Certificate (*.cloudfront.net) for the SSL Certificate option. Your Distribution Settings should look like the following:
Click on the Create Distribution button and your CloudFront distribution will be created. The Domain Name is your new CloudFront distribution URL.
Step 3: Create a User with Access to S3 & CloudFront in the Identity and Access Manager (IAM)
Go to the IAM located in the Deployment & Management section. Click on Users in the side navigation and then click on the Create New Users button. Enter a username of your choice and then click the Create button. Then download your Access Key ID and Secret Access Key. Make sure you save this in a safe place.
From the IAM Dashboard, click on Groups in the side navigation. Click on the Create New Group button. Name the group CloudFrontAccess or whatever you’d like. From the Select Policy Template list, select CloudFront Full Access, click on the Next Step button, and then click on the Edit Permissions link. That will take you back to the Select Policy Template list. Select Amazon S3 Full Access, click on the Next Step button, and then click on the Create Group button.
From the IAM Dashboard, click on Users in the side navigation. Click on the user you created and then click on the Add Users to Groups button. Click on the Group you just created and then click on the Add to Groups button.
Step 4: Install and Activate AWS WordPress Plugins
You will need two plugins to make CloudFront work with WordPress. Go download and activate the following plugins:
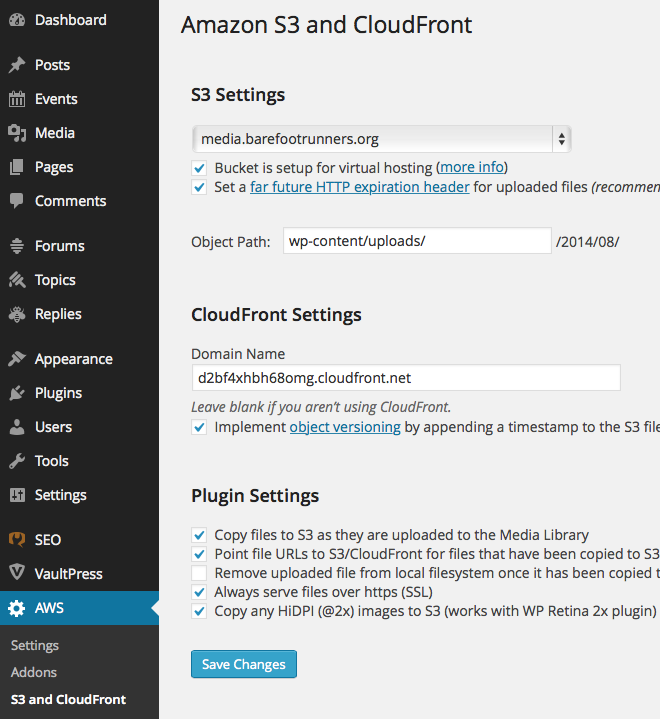
For the Amazon Web Services plugin, save your Access Key ID and Secret Access Key. Then go to the S3 and CloudFront plugin settings page and choose the bucket you created in Step 1. Enter the CloudFront domain name that was created during Step 2 (e.g. d2bf4xhbh68omg.cloudfront.net). Your settings should look like the following:
Now when you add new media to WordPress, it will save them on CloudFront and will insert a secure link to your media into your pages and posts.
How To Use Your Own Secure Domain with CloudFront
Updated 1/21/2016 thanks to this awesome announcement
This is the bonus round and also the most difficult easy because part of the process requires you to use AWS‘ Command Line Tools. Amazon just make it stupid easy to do and also made it FREE! However, So if you want to use your own subdomain or domain securely with CloudFront, you’ll have to do the following steps.
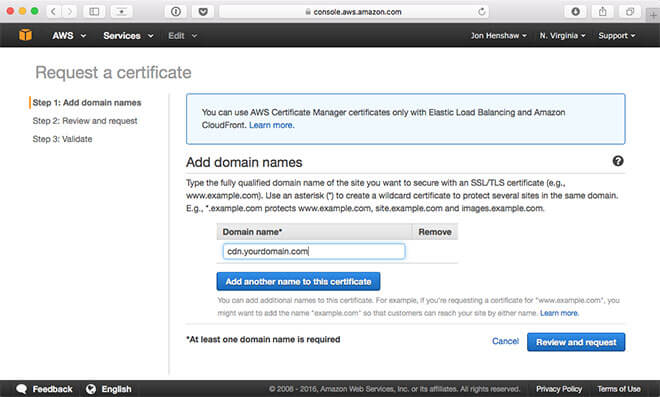
Step 1: Request a Certificate
In the AWS Admin Console, click on the Certificate Manager and then click on the Request a certificate button.
Step 2: Verify via Email
AWS will email a verification email message to the domain contacts. Once you get the message, click on the verification link.
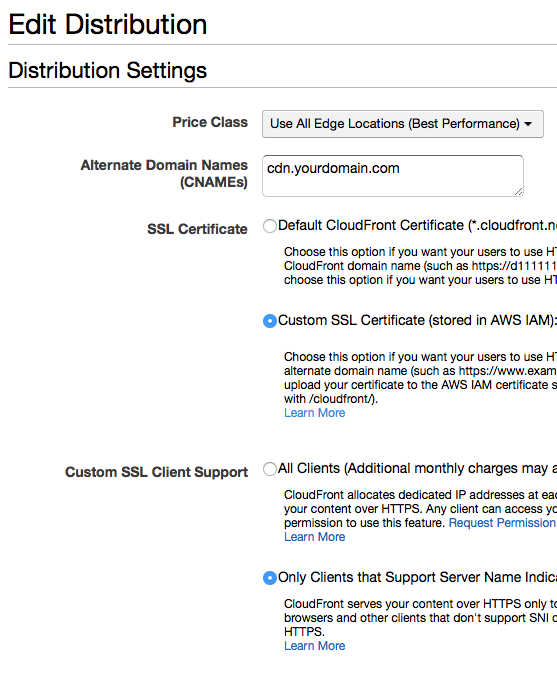
Step 3: Configure your CloudFront Distribution to use your SSL Certificate
From the AWS Management Console, go to the CloudFront management page. Click on the CloudFront distribution you created in Step 2 of the How to add CloudFront with SSL to WordPress section above. Click on the Edit button on the General tab. Enter the domain name your certificate uses in the Alternate Domain Names (CNAMEs) setting. Then choose Custom SSL Certificate (stored in AWS’ IAM) for the SSL Certificate setting and select the certificate you uploaded in the previous step. Next, click on the Only Clients that Support Server Name Indication (SNI) for the Custom SSL Client Support. If you choose All Clients, AWS will charge you $600/mo, and nobody wants that! Finally, click on the Yes, Edit button to save the changes.
It should look similar to this:
On the CloudFront Distributions table, the Status will say In Progress. This can take some time – sometimes hours. Once it says Enabled, your custom secure subdomain or domain with CloudFront will be live.
Step 4: Create CNAME for your secure subdomain or domain
The last step, which can be done immediately after completing the previous step (no need to wait until it’s Enabled) is to create a CNAME that points your secure subdomain or domain to your CloudFront address in your DNS. If you’re unfamiliar about how to do this, AWS provides detailed instructions.
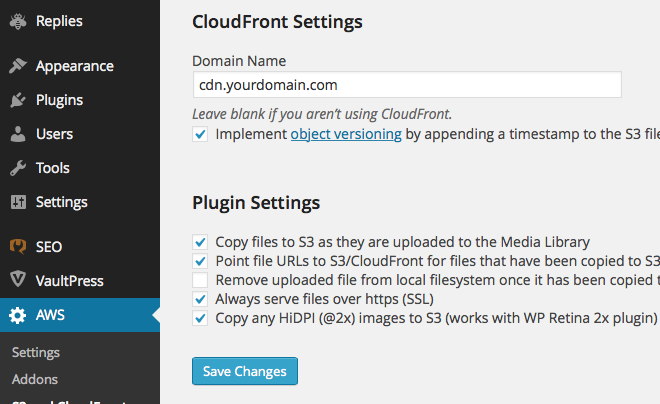
Step 5: Configure the AWS WordPress plugin
Once your DNS change propagates and your custom subdomain or domain with CloudFront is enabled, you will need to go to the S3 and CloudFront plugin settings page and change the CloudFront address to your subdomain or domain. It should look like this:
If you were brave enough to follow and complete all of the steps in this post, then you officially have a kick ass SSL ALL THE THINGS WordPress site and you deserve a drink!
References
I could not have figured this out without these informative posts.
- Setting Up SSL on AWS CloudFront and S3 by Bryce Fisher-Fleig
- How To Switch To HTTPS URLs For Optimal SEO by Joe Hall

Analyze over 20 different technical SEO issues and create to-do lists for your team while sending error reports to your client.
Awesome guide! But those of us that use Adsense actually will (or at least probably should consider) hold out since Adsense earnings take a hit under SSL.
Agreed. I just read the MarketingLand post about that http://marketingland.com/snags-googles-ssl-vision-sites-can-get-tripped-quest-secure-web-97266
Really nice guide, I was looking forward to this since you teased it on Twitter. I’ll be holding off for now but this will come be be a valuable resource, thank you!
I’d like to throw in a quick mention that this plugin https://wordpress.org/plugins/velvet-blues-update-urls/ makes the internal/attachment URL issue WAY easier 🙂
Nice plugin suggestion. Thanks!
thanks for the amazing compilation.. but I am curious, why raven haven´t done it yet @jonhenshaw:disqus ?
Thanks! We’ll do it eventually, we just haven’t made time to do it yet. Too many other projects we’re working on right now 🙂
What a great article! Just one question, do I have to buy a separate SSL certificate just for cloudfront or my current domain certificate should do?
You have to buy a separate certificate for CloudFront if you want to use your own domain or subdomain. And that domain or subdomain cannot match your WordPress site, because a domain or subdomain can only point to one server.
Thanks,
Seems like a lot of work just to have the own domain. Are there any real SEO advantages this piece when compared to using CF domain name through SSL? Or is it purely aesthetics and branding? Sorry I am a newbie in SEO world.
While getting an SSL certificate for your CloudFront domain should have some SEO benefit, it’s really more about aesthetics and branding. It’s not absolutely necessary, I just prefer it.
SSL security will also help you to ge beter rank in SERPs as Matt Cutts declared that Google will give privilege to https blog more on http websites.
SSL security will also help you to ge beter rank in SERPs as Matt Cutts declared that Google will give privilege to https blog more on http websites.
This is incredibly helpful. Thanks for putting in the time to make a detailed guide! Now I need to find a weekend I can do the work.
This is incredibly helpful. Thanks for putting in the time to make a detailed guide! Now I need to find a weekend I can do the work.
Good guide but might I suggest useing CacheFly (it comes with a SSL certificate)
Fastly, you can get EdgeCast with SSL from speedyralls for under 10 a month there all great CDNs but if you want dynamic content cacheing EdgeCast ADN, CacheFly SAAS, Akamai can be bought for under 80 through Cache Simple ( and more) but Incapsula might offer the under $30 really amazing dynamic content cacheing CDN / WAF with GlobalSign’s Cert standard (you will always need a with The ability to upload your own certificate of choice for their $300 enterprise plan.
if you are going to spend money buying a Cert the I really think Digiacert & GlobalSign offer the best deal for people useing CDNs or WAF’s Sucuri’s $9 WAF is SPDY fast too
Great suggestions. Thanks Thomas.
Good guide but might I suggest useing CacheFly (it comes with a SSL certificate)
Fastly, you can get EdgeCast with SSL from speedyralls for under 10 a month there all great CDNs but if you want dynamic content cacheing EdgeCast ADN, CacheFly SAAS, Akamai can be bought for under 80 through Cache Simple ( and more) but Incapsula might offer the under $30 really amazing dynamic content cacheing CDN / WAF with GlobalSign’s Cert standard (you will always need a with The ability to upload your own certificate of choice for their $300 enterprise plan.
if you are going to spend money buying a Cert the I really think Digiacert & GlobalSign offer the best deal for people useing CDNs or WAF’s Sucuri’s $9 WAF is SPDY fast too
Hi Marios, firstly thanks for the great guide, and secondly I just have a few newbie questions I was hoping you could help with?!
I have an SSL cert with hostgator for my domain, but I presume I need to order a new one to use with AWS. Should I order a basic positive SSL, and when I choose a domain to secure do I use the subdomain AWS assigns, example: 1p40973vgxse.cloudfront.net?
If you use AWS’ domain, then they are already secure. For example, the CloudFront example URL you gave already has SSL enabled. Just add https:// in front of it. You only need to get your own SSL cert for AWS if you plan to use your own domain. In which case, the lowest price Positive SSL from Comodo should work just fine.
Ok I understand, I had a read through again and I see what you mean. thanks for getting back to me Jon.
If you use AWS’ domain, then they are already secure. For example, the CloudFront example URL you gave already has SSL enabled. Just add https:// in front of it. You only need to get your own SSL cert for AWS if you plan to use your own domain. In which case, the lowest price Positive SSL from Comodo should work just fine.
I’m following these exact steps now! So helpful, thanks.
Let me know if it doesn’t work so I can determine if it’s user error or if I need to rewrite something 😛
Hi Jon. Followed the instructions of your tutorial. Exactly.
Domain: rickbronkhorst.com / Testing everything new here.
Want to implement it on a NPO website hiresa.org
Do you have a solution for Redirect loops?
Error:
This page isn’t working
rickbronkhorst.com redirected you too many times.
Try clearing your cookies.
ERR_TOO_MANY_REDIRECTS
I am hosting WordPress on an AWS hosted virtual server. How do I implement an SSL certificate through an AWS hosted instance? I have the CDN and media files all working fine through HTTPS, just need to secure everything else now. Any guidance would be much appreciated.